Waveshare Stepper Motor Hat
By: Justin Stewart
10-15-2024
Home Page
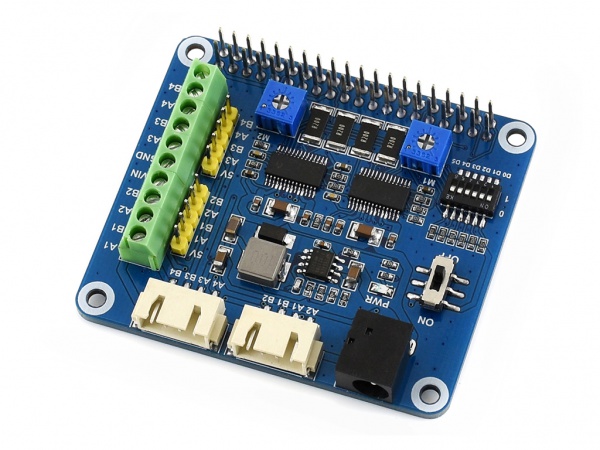
Table of Contents
A Stepper Motor Hat for the raspberry pi 4
I recently embarked on a robotics project where I needed to control multiple motors. For this, I chose the Raspberry Pi 4 due to its versatility and ease of use. However, I needed more precise control over the motors, so I opted for the Waveshare Stepper Motor Hat. I found that detailed documentation for the Hat was lacking, which inspired me to document my experience for future tinkerers who may find themselves in a similar situation. The stepper motor hat is available on amazon, for about $20.
The Waveshare Stepper Motor Hat provides the ability to control two stepper motors simultaneously through the Raspberry Pi’s GPIO pins. Using Python, you can send commands to adjust the speed, direction, and stepping modes of each motor. Inside my Github repository there is a Python script motor.py that offers basic control functionalities, while the DRV8825.py script enhances control by interfacing with the DRV8825 stepper driver.
Additionally, I created a 3D printable mount to securely attach the hat to my Raspberry Pi 4, using M2.5 screws for stability. Given that my workspace can reach temperatures of 100°F (38°C) during the summer, I added a GeeekPi cooling fan to prevent the system from overheating. To accommodate both the fan and the motor hat, I installed two 40-pin stacker headers, which raised the hat slightly above the Pi, leaving room for airflow.
Power Requirements
Powering the entire setup required careful consideration. I used a 12V, 4A power supply that was capable of powering the Raspberry Pi 4, the Waveshare Hat, and the NEMA 23 stepper motor all at once. By connecting the power supply to the Hat's DC barrel jack, I could power both the Hat and the Raspberry Pi via the Hat's integrated on/off switch. For those who prefer to power the Raspberry Pi separately, it is also possible to use a dedicated power adapter for the Pi, though I found the single power source setup more convenient.
Wiring and Configuration
To ensure the stepper motors were wired correctly, I referred to the datasheet of my NEMA 23 motor, which specified connections for the A+ and A- terminals on the Hat. Additionally, the Hat has DIP switches located on the underside, which can be adjusted to configure the step mode (e.g., full-step, half-step, etc.). For most users, leaving the DIP switches in the "0" position will allow software control of the step mode through the DRV8825.py script. See the pdf manual for further explanation.
The first three switches affect the 1st motor, and the remaining three affect the 2nd motor.
Manual and Datasheet
For more advanced configurations and detailed instructions, I recommend checking out the official Waveshare Stepper Motor Hat Wiki. Be aware that some of the instructions may require interpretation, as they can be somewhat technical.
I also documented my project on Github, where I’ve provided scripts and 3D models for anyone looking to replicate this setup.
3d printed support
One of the more unique aspects of my setup was the use of a 3D-printed support structure, which helped stabilize the Hat as it sat atop the Raspberry Pi. You can find the rpiHatCylinder.stl file for 3D printing on my Github repository. With this addition, the Hat remains securely in place, even when the motors are in motion. This setup was particularly useful when controlling a robotic gripper that I designed using a pair of scissors.
final thoughts
By following these steps and making use of the resources provided, you can achieve precise control of stepper motors in your Raspberry Pi projects. Whether you’re building a robot or automating a mechanical task, the Waveshare Stepper Motor Hat offers a robust solution for motor control.
Get The Code
For more information, including the necessary code and a PDF manual, you can visit the project's repository on Github.